Friday, 20 June 2014

Prototype - Enemies Health

First of all current Unreal Engine 4 HUD implementation is really pain in the ass. It's just Canvas from Unreal Engine 3. As far I know Epic is working on UI system, but we will need to wait 3-4 months to use it. That's why I will stick with Canvas for this project, but if you have a game with lot's of UI you should think about your solution or other frameworks. (scaleform for example)

This one is hard and I needed a help of a Programmer to get this done. Will try to describe it as much as I can but this functionality won't fit to other games because I've used Shooter Game example HUD.
Getting the HUD
Open Shooter Game example and find HUDAssets2 and HUDMain. Reimport them to your project. When you play shooter example you can see ammo count in bottom right corner of the screen. We will try to reimplement it to be enemies health bars.

MainAIPawn
Create couple of variables:

  • nStripes - int, default: 10  (it will be our health bars count)
  • HealthBar - float, array,
  • MaxAlpha - float, default: 1,
  • MinAlpha - float, default: 0.2,
  • dAlpha - float,
  • MaxHealth - float, default: 100,
  • fullBars - int,
And one Scene Component - HPBarLocation. 

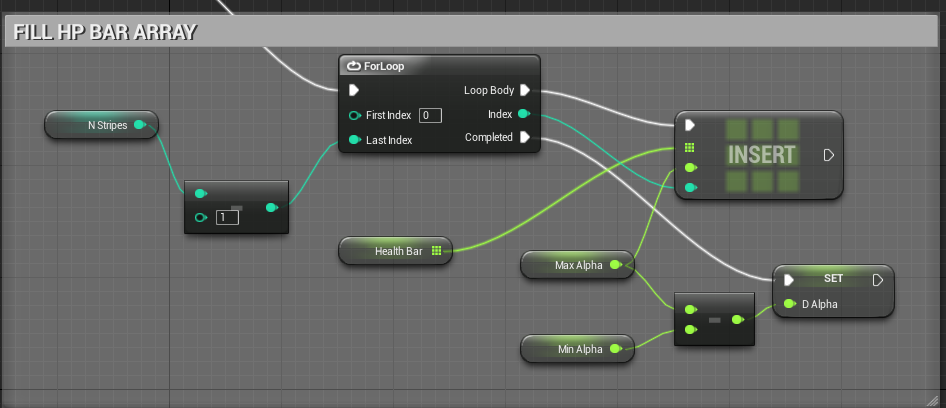
Now create Begin Play event and fill the HearthBar array like this:
MyGame
Go to MyGame blueprint and add variable: MainAI_Pawn and name it CurrentEnemies. It should be array again. We will store all enemies in this array to be able to get it from other classes.

Spawn Manager
There is an bug on Mobile where you are casting to your classes from Level Blueprint - HUD disappear. (btw this is the first non-fixed bug that I found in UE4) That's why we will move our spawning to new class. This class will be base for spawn manager later on.

Create new Actor Blueprint and name it SpawnManager. Place it somewhere in the level. Add new variable: SpawnPoints (array from EnemyText), should be editable so you will be able to assing SpawnPoints to it from Level. So assing your spawn points to the array. 

Now let's spawn something. 
It's really placeholder spawn mechanism, simple and bugged but should be enough to test HUD.

Back to MainAI_Pawn
Create function UpdateHPBar and try to copy everything from this:
This basically updates the Alpha on the 10 bars in Health Bar.

While still being in MainAI_Pawn go to Damage Event and after setting the Health check if health is < 1 if yes then set ShouldDrawHPBar to false and CurrentSpawnPoint's IsBusy should be false as well. 

MyHud
Now move to MyHUD and create variables:
  • U - float, default: 146,
  • V - float, default: 149,
  • EnemyHPOffset - float, default: 7,
In DrawHud function:
What this basically do is going through all enemies and all HealthBars elements and draw them with offset. Scale is used to draw everything smaller when enemy is far away. At this point you should analyze how Draw Texture works hope this image will help:
That's all now just run the game and here's the result. 
Basically there is lot of better ways to draw enemies HUD but I'm far away from graphics artist. What you should try to create is fill bar and border and just scale down the fill bar it would be much more simpler than this.

In next post I will work on Spiders - first polishing iteration, there is couple of things that can be done to improve their prototype quality.

Thursday, 19 June 2014

Prototype - Laser Scope

In this post I will create and add laser scope into the weapons so it will be easier to shoot. Another thing will be recoil when our arm is "steady" (when we aren't shooting) 

Laser Particle
I will use this tutorial which is really great! I've created package with everything (material, particle, textures) ready to use here, but you should try to create it by yourself.

Attaching Laser
Go to MyCharacter and create Particle System component with LaserScope FX. It should have disabled AutoActivate.

Add new bool variable into Graph and name it: bLaserScopeEnabled it should be true by default for now.

Now move into ChangeWeapon function. Create Sequence and attach LaserScope Component to MuzzleFlash socket.
Recoil when "steady"
Basically what I want to do is to have zero recoil when I'm aiming. This is really simple as well. I will check if player weren't shooting for X time and then next shoot will have zero recoil. 

Go to MyCharacter and create new floats variables: LastShootTime and ZeroRecoilTime (set to 0.5)

Now in EventGraph go to place where you have your pistol shooting. Before delays set LastShootTime.
Now go to PistolProjectile. And check LastShootTime like here. If it's < then 0.5 we won't be doing any recoil. 
You may be confused why I haven't show anything after Single Trace - it's just a copy of everything below which should be implement by you in earlier posts.

Final result
I won't be showing any video this time because it's hard to see what's happening - you need to play by yourself. Basically when you wait 0.5 seconds before your next shoot you will shoot exactly where the laser is pointing so it's much more easier to aim and create critical strikes now. +1 to gameplay.

In next post I will be adding health bars into enemies.

Tuesday, 17 June 2014

Prototype - Critical Damage System

What I really like in games is critical strikes. I'm always playing rogue or some character with big crit chance and attack speed. I won't do the same here but there are couple of things that can be done:
  • If you hit enemy really near weak point there will be chance for critical damage,
  • If you get critical damage game should be able to show you this,
  • You should know how much damage are you dealing, 
Thanks to that more advanced players will be able to kill an enemy with one shoot. 

Change AnyDamge to PointDamage.
In your MainAI_Pawn replace AnyDamage to Point Damage. Do the same in SpiderPawn.

Go to Pistol_Projectile and change AnyDamage to PointDamage. Direction can be set like here:
Heart
Open MainAI_Pawn and create new Scene component - name it "Heart". There is one thing weir with components you aren't able to change them in classes that extend this actor. So open SpiderPawn and create Scene component, name it HeartSpider. 

Still in SpiderPawn go to Begin Play event and set Heart to HeartSpider. 
Go to MainAI_Pawn and to PointDamage Event. We will need to check how far from Heart we shoot. 
You can make variables to be able to quickly balance critital damage multiply and distance from heart.

Now create new blueprint, extend from Actor and name it EnemyText. Add couple of variables:
  • Text - float, (editable and expose on spawn)
  • Alpha - float, 
  • WasCrit - bool, (editable and expose on spawn)
  • GoingBack - bool,
  • Lifetime - float - default: 3
For now we will leave this blueprint because we need to add something into MyHud. So open MyHud blueprint and add two variables: TextColor(LinearColor) and EnemyTexts - this should be EnemText type and should be array. That's all for hud now.

Go back to EnemyText and create Tick Event. We will animate this actor - it will move up.
That's all here. Now move into MainAI_Pawn and PointDamage event. We would need to spawn this actor when we shoot to the enemy. 
And after spawning we need to manage EnemTexts array in HUD. So here's the rest part of Spawning Enemy Text:
Everything is ready to draw it on Hud.


HUD
Open MyHud and go to Draw Function. Create Sequence and add this to your blueprint. It will draw damage from enemies:
That's all! Now when you shoot your enemy you will see floating damage text there.

Critical Damage Projectile and Camera
Create a copy of MyProjectile name it "CriticalProjectile" and change couple of things:
  • Add spring arm as we did in Steer Gun,
  • Add camera and assign it to spring arm,
  • Change projectile speed - from 2000 to 3000,
  • Remove the mesh,
  • Add audio component with sound above,
Go to Graph and remove everything. Leave EventHit only and:

Now go to MainAI_Pawn and add sequence when we know that there will be critical strike. (before spawning EnemyText)
It's enough for prototype but it will need to be polished a lot later.

Final Result
In next post I will add laser scope to the weapons so it will be easier to aim.

Saturday, 14 June 2014

Prototype - Improving Controls

Basically the game should support PC and Mobile controls so we need to keep that always in mind when prototyping. In this post I will focus only on Mobile Controls. There will be two major control schemes: 
  • Gyro/Accelerometer looking, 
  • Touch looking, 
TIP: For emulating mobile controls on mobile use UDK Remote Tool. Thanks to it you will be able to tap, move your device and test controls on PC without needed to build the game on device.

To move forward we will need some class that we can get to from any other classes. As far I can know Epic is working on better solution for game states etc but we don't need it right now.

Create new ENUM and name it ControlType, add three values to it:
  • Mobile_Tilt,
  • Mobile_Touch,
  • PC
Open MyGame and create new variable Controls which should extend from ControlTypeEnum.

Create Begin Play Event and set Controls to Mobile_Tilt. For now here we will change control types.

Open Project Settings -> Input, and clear Default Touch Interface.

Tilt Controls
Open MyCharacter and create variables:
  • LastTilt - float,
  • TiltSensitivity - float set to: 40,
In UE3 everything connected to input was made in PlayerController but I see that inputs in examples are done in Characters so we will do it in MyCharacter.

Go to Event Graph and add Tilt Event like this:
Use UDKRemote tool to test results. Tilt is finished at this point. I really like to control shooters like that when there is no movement. It's easy and intuitive to control look-at like that.

Touch Controls
In MyGame in BeginPlay event change Controls to Mobile_Touch.

Go to MyController (we will do it here because it's messy) and add variables:
  • LastX (float),
  • LastY (float),
  • WasTouched (bool - set to true),
Add Mouse X event and create this blueprint (thanks Andrzej!):
I'm using MouseX because Tick isn't working with Adding Inputs. It's similar to Tilt Controls but here we are making sure that we aren't making changes if WasTouched is false. 

You can increase sensitivity by changing Division of hardcoded 10. Just create TouchSensitivity float variable and pin it there.

Last thing you need to do is to add Controls switch to PC mouse. So PC controls will work as well.


Result
For now we aren't moving camera a lot but later there will be challenge here, don't worry:)
Tilt
Touch
In next post I will create Critical Damage system and we will move into Spider polishing because now it's boring to fight with this enemy.

Thursday, 12 June 2014

Prototype - Enemy Spider Robot

It's really hard to find good characters so I will start with free one from Popup Asylum. 

I wasn't able to import those into Unreal so here you can find package with mesh and animation DOWNLOAD - just copy it to your Blueprints/AI.

Basically the first enemy won't be so effective but it's easy to implement. If you have ideas how I can improve the mechanics feel free to comment!

What we need to do with the spider:
  • Should move to player with animation,
  • Should shoot player using some laser (and use RateOfFire),
  • Player should be able to kill the spider,
  • When spider is dead he should play death anim and maybe some rag doll,
We will be using Anim Notify, Animation Blueprints and modify tasks. 

Move To Player
Right click on Spider Skeletal Mesh and Create -> Animation Blueprint. Name it SpiderAnimBlueprint. 

Create new blueprint and extend from MainAIPawn. Name it SpiderCharacter.
Assign Spider Skeletal Mesh to Mesh component. And use SpiderAnimBlueprint as Anim Blueprint Generated Class.

Open SpiderAnimBlueprint and move into Anim Graph. Right click and select WalkForward animation - connect it into Final Animation Pose. You will see movement now, but it will be rotated. 

Go back to SpiderCharacter and rotate mesh component so it will be forward.

Close everything and open Level Blueprint. Change spawning actors from MainAIPawn to SpiderCharacter.

As you will see you will need to work with rotation, scale and WalkSpeed (from movementcomponent), as well CylinderComponent size to mach the spider size.

Material - fresnel.
You can use Fresnel as I did - it's something like Rim Lighting. 

I will be using Fresnel later to improve graphics quality so you can experiment with it. 


Play Attack Animation
Open SpiderCharacter blueprint and add int variable: SpiderState.

Open SpiderAnimationBlueprint and go to AnimGraph.

Create new block Blend Poses by int. If you right click on it you will see Add Blend Pin - there should be 3 of those.

Create new int variable: SpiderState. Add new animations: Attack and Death and assign them to Blend like here:
Now go to EvengGraph and add Event Blueprint Animation. Get SpiderCharacter and set SpiderState from SpiderCharacter like here:
That's all for AnimationBlueprint, now move into AI_MainPawn and add new input to MyAIAttack. It should be float and name it DeltaTime.

Open SpiderCharacter and add event MyAIAttack right click on that and add super call. 
Thanks to that we will be calling everything that is in AI_MainPawn and after that everything new that's in SpiderCharacter.

Create new float variable AccumulatedDelta. Now we need to use RateOfFire. So create something like this:
Thanks to that we will be firing Print String with RateOfFire. You can close SpiderCharacter for now. 

Create new blueprint extended from AnimNotifyState and name it SpiderAttackNotify. Open it.

You will see 3 functions: Tick, End and Begin. Right click on Tick and Implement Function. We will be calling MyAIAttack from this class like so:
You can close SpiderAttackNotify.

Open SpiderWarior_Attack animation. Right click on Nofifies and add SpiderAttackNotify.
Now move the notify to the place in animation where you want the spider to attack. 
That's all here. Basically Notifies are really nice tool and you should experiment with it a lot. 

Finally open SpiderCharacter and Set SpiderState to 1 right after Event My AI Attack fire. (you should disable all of PrintString at this point only leave one in SpiderCharacter)


Attack Player
Open spider skeletal mesh and create socket named "Spider_Attack" at PA_WarriorWeapon1.

Open SpiderCharacter and create new variable: Beam -> Particle System. Assing P_Electricity_arc particle to it, and disable Auto Activate.

Create Begin Play function and attach Beam to the socket. 
Open SpiderAttackNotify and implement Begin and End. Begin:
End:
So this will activate beam effect and deactivate after notify end.

For now Spider isn't doing any damage, we will do that later when we will have player health bar.


Killing Spider
Will need to implement basic Damage system and we have an problem that we don't have main projectile so it need some refactoring. 

Let's say we want to kill the spider using Pistol. Open Pistol_Projectile and in RailHit function add this:
Be sure that your Min and Max damage aren't 0. 

Now open MainAI_Pawn and add Event Any Damage like here:
This will modify health variable.

Open your blackboard data MainAIData and add Bool variable named IsDead. After that open your Behavior Tree and add one selector in the beginning with Blackboard decorator. (rest of the tree shouldn't be changed)
Now open SpiderCharacter and create Event Any Damage. 
That's all. As always experiment a lot with everything!


Final Result

In next post I will implement controls so it will be easy to shoot. There are couple of problems with Behavior Tree that should be fixed in 4.2.1 - so I won't be moving forward with AI before the issues will be fixed.

Wednesday, 11 June 2014

Prototype - Enemies Functionality

At least I can work on enemies. This topic will be big so I will try to move slowly. 

What I want to create first is just some AI moving to me and attacking. I don't have any experience using UE4 AI features so don't count on my solutions. 

This post will be about AI and Behavior Trees:
  • Main AI class,
  • Navmesh,
  • Behavior Tree (find target, move, attack, if you can't attach search for good spot)
I won't be doing any spawn system now, but later on I will need some spawn manager. I wan to do them first to learn how to use UE4 AI systems.

Spawn Point 
Player won't be able to move so we will create some routes near player.

Create new blueprint and extend from TargetPoint name it Target

Create new blueprint and extend from TargetPoint name it SpawnPoint.
Open SpawnPoint and add those variables:

  • IsBusy: bool, 
  • Target: our created Target
Those variables should be editable. Place them on level and assign Targets to SpawnPoints.

Main AI Character Class and Controller Class
Basically try to always focus on object oriented "blueprinting". I will create main classes that will have core functions, and my enemies will extend from them.

Create new blueprint, extend from AIController name it AI_MainController.
Create new blueprint, extend from Character and name it: AI_MainPawn.

Open AI_MainPawn and create couple of variables:
  • Health (float)
  • Damage_Max (int),
  • Damage_Min (int),
  • RateOfFire (float),
  • CurrentSpawnPoint (our SpawnPoint),
  • HasTarget (bool),
All variables should be editable.

Open Components and add Scene Component, name it: StartTrace and move it forward to cylinder component like here:

Select CapsuleComponent and change Collisions to Custom and block Visibility. Disable HiddenInGame as well. (for collision do the same for MyCharacter - it's needed to get proper traces to our player)
Select CharacterMovement and enable Use RVOAvoidance and set Weight to 0.5. This will cause AI to avoid others AIs. Will be useful.

Still in AI_MainPawn, open Graph and Create new functions:
  • MyAIMoveTo, (inputs: "Target" type Actor)
    Add AIMoveTo block:

  • MyAIStop,
    Add StopMovement
    We won't be using those functions now but I've a feeling that we will need them later.


  • MyAIAttack (inputs: "Target" type Actor)
    Add print function just to know that actor is attacking.
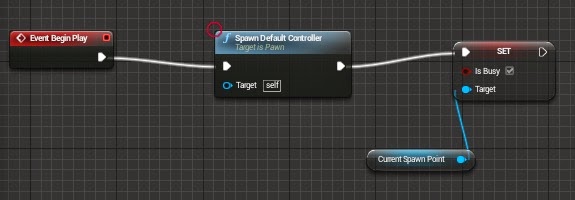
Now go to Event Graph and add Begin Play event: spawn default controller and set IsBusy for Current Spawn Point. So later we won't be spawning anything in that spawnpoint before killing this enemy.
Go to defaults and change Controller Class from AIController to AI_MainController.
That's all what's needed for Pawn and Controller. Let's move forward.

Blackboard Data - Data Asset
Create new DataAsset with type BlackboardData, name it MainAIData.
Add Keys:
  • CanAttack - Type_Bool,
  • Target - Type_Vector,
  • SelfActor - Type_Object
  • ReAttackTime - Type_Float.
Close MainAIData. 

Creating new Tasks
Create new Task and name it PickLocation.
Open it. And create something like this:
What we are doing here:
  • Event Receive Execute is something like Begin Play - when this task will be executed from Behavior Tree (which we don't have yet) this will popup,
  • We are casting to our classes,
  • We are picking location from SpawnPoint to Target, (RandomFloat means from 30% to 100% of the length)
  • Location is assigned to our Blackboard data asset, so it can be readable by Behavior Tree,
  • Finish Execute is telling Behavior Tree that this task is completed,
Create another Task and name it Attack.
This will just fire our MyAIAttack function from our MainAIPawn.

Create another Task and name it CheckIfWeCanAttack. Open it and create something like this:
This looks complicated but it's easy:
  • We are doing trace from StartTrace to Player,
  • If we hit our Player then we can change CanAttack bool from Blackboard Data Asset,
  • If we won't hit Player then pick location from AIPawn to Player - so it will try to come more near player. We are assigning Target vector and CanAttack bool as well,
Behavior Tree
Now open Editor Properties go to Experimental and enable Behavior Tree Editor. Create new Behavior Tree and name it MainAIBTree.
Open it. This is my Behavior Tree:
When adding sequences or selections you can add Services and Decorations. You can add Blackboard data as well:
Behavior Tree editor isn't complicated take some time and try to create the same Tree as I have created. Just experiment!

There is one problem (I have it) when you close your editor and open it again you will need to add your custom Tasks to Tree again. (Here's the Bug)

Test in game.
Open level blueprint and create this test spawning function:
Before you lunch you need to add Navigation Bounds volume into the level and scale it to fit your scene. You can press "P" to show the navigation and in game you can use "show navigation". If nothing appear you should restart the editor and place it again.


Here's how it's looking (sorry for the audio;/):

I know that they are just cylinders, but trust me - core functionality is there :)
In next post I will create robotic spider that will use that system, he will shoot you and you will be able to shoot him as well.