
Enemy spec:
- Can crounch,
- Will shoot from random position,
- Will reload his weapon,
- Can do Melee damage,
- If you hit in the head - ragdoll will appear,
- Mouth simple animation,
Animation States
First of all you really should watch Epic tutorial about blend spaces and states and read about them here.
Create new blueprint extending from MainAI_Pawn, name it Orc_Pawn. Change walk speed to 200 (in defaults) and add isCrounching bool variable. Make it exposed on spawn.
I assume that you imported all of your animations at this point. If you have a problem with them post in comments.
We will need two blend spaces (1D ofc)
- CrouchWithWeapon_Idle to CrouchWithWeapon_Walk,
- WithWeapon_Idle to WithWeapon_Walk,
The max speed should be set to 200 (as in Orc_Pawn defaults)
Now create AnimationBlueprint and add variables:
- Speed - float,
- IsCrounching - bool,
- CurrentVelocity - float,
In your Event Graph update those variables like here:


I'm using interpolation because Velocity is changing really fast and I don't know why. Here's a topic about that on AH.
Now in Anim Graph we will be using Montage animations so it will be blended as earlier character. Locomotion will be described in couple of seconds ;)
And here's locomotion. Basically I'm checking if isCrouched is set or not and use different blend spaces.
Now in your spawn manager change spawning to Orc_Pawn and create Random Bool as isCrouching variable.
At this point you will see that your Orc is moving and stopping with proper animations!
Animation - Reload
First let's prepare our reload animation. I will use state machine here and I don't know if it's the best solution. You could use animation montages for this but I'll try to improve current state machine.
Open your Animation Blueprint and add new bool variable: isReloading.
Now go to your Locomotion state machine and add two new states coming from crouching and walking - CrouchReload and WalkReload like here:
We are going to Crouch_Reload when isReloading == true. We go back if it's false. The same for Walk_Reload.
As for the states - I'm blending reload animation with our blend space using Bip01_Spine bone. Here's crouch_reload example - the same should be added to Walk_Reload but with walk blend space and walkreload animation.
At this point when you change isReloading you should see reloading animation. We aren't driving isReload variable at this point. Open Orc_Pawn and create new bool variable: isReloading. Create new function SetReloading and add one bool to input, and set isReloading using this function like here:
I'm using function to change this bool because weren't able to change it from notify.
Now create new Blueprint extending from AnimNofity and name it Orc_ReloadEnd. If you don't know anything about notifies just read earlier posts. Using this notify will set IsReloading to false so the animation will play only once.
Now add this notify into your reload animations (in the end of the animation) if you don't know how - as always: read older posts! :)
In your animation blueprint event graph you need to set isReloading from Orc_Pawn - don't forget about it!
At this point Orc will play reload animation when isReloading is set.
Mouth Simple Animation
This will be simple. Open Animation Blueprint and add some variables:
- isShouting - bool,
- isOpeningMouth - bool,
- ShoutTranslation - vector,
- ShoutRotation - rotator, (0,5, -25)
- ShoutAlpha (float),
Now in your anim graph after your locomotion we will modify Jaw bone like here:


In event graph we will increase ShoutAlpha and decrease it so it will look like the Brute is yelling.
Do Once block is playing shout sound. You would need to properly setup delays for animation to fit your sound.
Animation - Recoil
We were doing recoil earlier in our fpp arm mesh. This time I will try to do it better and only using animation blueprint. It will be harder than mouth animation because we will need to modify couple of bones.
First let's create the functionality. In your Animation Blueprint add new variables:
- RecoilRotation (rotator: 0, -2, 0)
- RecoilAlpha (float,
- RecoilTranslation (vector: 0,-6,0)
- RecoilStart (bool)
- isShooting?(bool - you will use that for test while simulating)
Now in EventGraph let's fill RecoilAlpha as we did with mouth. If you would like to have better results you should add more random to the variables here.
And in AnimGraph let's modify some bones with the RecoilAlpha.
Modify should be in ComponentSpace and it should be Additive.
You can test it out if isShooting is set to true. Just simulate and polish the effect. You can add more bones, create more variables for different bones.
Shooting - Projectiles
So we have recoil but what about shooting real bullets? Go to your OrcPawn and add custom event - BruteShoot. Compile and go back to AnimationBlueprint. In the event graph let the OrcPawn know that we have started recoil.
 |
| New block highlighted. |
Go back to OrcPawn and try to spawn some projectiles! We need to create new projectile for this enemy. Basically you should have some base for projectile - I have created mistake when started working on this project and I've different projectiles blueprints for all weapons...it should be one with different properties.
But let's move forward. Open Orc mesh and add new socket from Bip01_L_Finger11 - name it Weapon. Create an copy of Rifle_Projectile blueprint, and open it.
Add OrcReference variable - extending from Orc_Pawn. Remember to assing your Orc_Pawn when spawning this projectile.
And here's the blueprint. At this point you should be able to change this blueprint by yourself without my help. If you can't read earlier posts!
So this is our projectile - you can create a copy of the beam and make some modifications to it as you want.
Earlier we have created muzzle flash for Rifle - copy it and add some modifications. Emitters should have lifetime - now they are spawning forever. Emitter Loop should be 1 and you should use Burst List. If you don't know what I'm saying - read earlier posts! Or watch cascade tutorials on the web - there's a lot of them. Latest from Epic can be found here.
Now if we have projectile and muzzle flash. Lets open Orc_Pawn and spawn them in custom event - BruteShoot.
Now Brute will move and shoot all the time if you have isShooting enabled in Animation Blueprint.
Shooting - Ammo and Reload functionality
Open Orc_Pawn and add some variables:
- CurrentAmmo - int: 5
- MaxAmmo - int: 5
- isShooting? - bool,
First lets make the Brute shoot. Create Begin Play event and set isShooting to true after 1-2 float delay. Remember to set isShooting in AnimationBlueprint from this Orc_Pawn bool. If you don't know how to do that - read older posts! ;)
Still in Orc_Pawn create new function : FillAmmo and in this function set isShooting to True and CurrentAmmo to Max Ammo.
Now go to Orc_Reload_Nofity we have created earlier and call FillAmmo function from the owner.
Go back to Orc_Pawn and in BruteShoot function decrease CurrentAmmo and how much ammo do we have.
Now Brute is reloading his gun. Yay.
Ragdoll
If you don't know how to create them just read older posts :) I assume that you have successfully prepared physical asset in PHAT. When we want to enable ragdoll:
- When Brute is dead,
- When critical was taken (then impulse is needed),
So we need to deal with health - read post about Golem and try to remember how we are managing health. We will do the same here.
 |
| isDead should be set to TRUE - my bad! |
And now we have nice ragdoll created in 15 minutes.
Destroy Body Parts
We will do only base functionality for this. If we want to break all of the bodies we should prepare animation blueprint and animations different. I will try to create full body destroy like fantasy skeletons later, but not now.
Which bodies we can break:
- Head,
- Arms and upper arms,
- Legs? - let's test this out,
Issue with the skin: Basically we can't break bodies in this mesh because it wasn't rigged correctly. Bones have to much influences and when I'm breaking them I can see a lot of polygons attached to them... :(
If you have prepared mesh correctly you can add impulse to the BoneName which will be bigger than "Breakeable" values in PHAT.
What you can do is to attach Heart Component to the Head. To do that you need to create new socket from Head bone. Then in Begin Play: Heart -> attach to -> mesh. So now we will get critical strikes when we hit head. Remember that there are some variables that can help: HowFarFromHeart and CritMultiply.
Blood
Blod Particle.We will use early created particle: P_body_bullet_impact. Just create a copy. Create a copy of material which particle use.
The material should be Unlit and you should connect color to Emissive Color. In your particle change color over life to green. You can change size as well.
Melee Damage
This will be simple. First let's randomly set if Brute will go near player. To do that just change MinProcentageOfRoute and Max. In Begin Play
Now create Custom Event. It should be triggered in Begin Play.
Still in Orc_Pawn create new function which will take bool as input. Function should set isShooting variable from input.
Create new Blueprint extending from Notify State. Name it Orc_Attack. Open it. Implement Begin and End functions. Begin function will set isShooting to false and End function true.
Here's example:
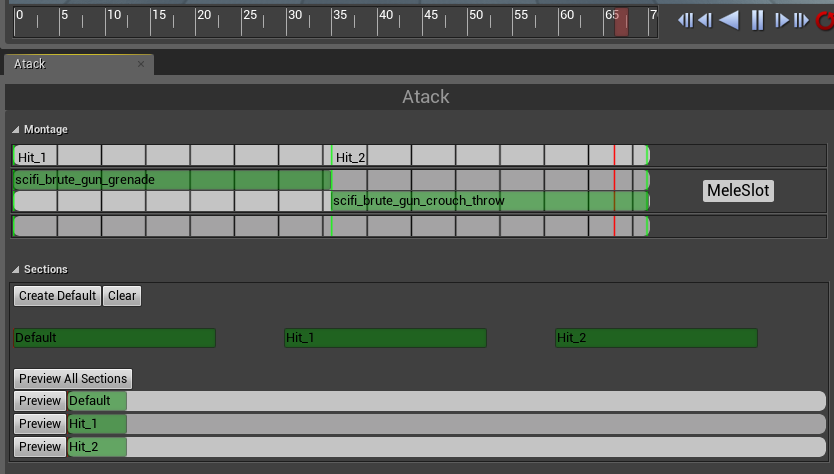
Add this notify to two animations: scifi_brute_gun_grenade and scifi_brute_gun_crouch_throw.
Now create new montage which will have these two animations. Create two sections: Hit_1 and Hit_2 so we can randomly play one of the animation.
And that's all.
Sounds
You should search here. Remember to convert mp3 to wave.
I won't be posting about adding sound this time - at this point you should be able to do it by yourself.
Final Effect
No comments:
Post a Comment